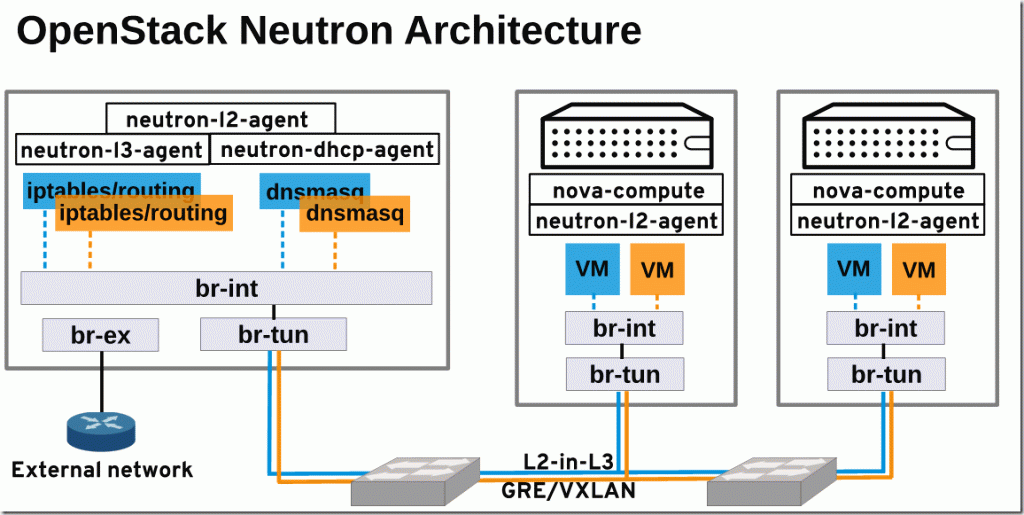
Openstack Cloud
mkdir lab2
cd lab2
vi Vagrantfile
Vagrantfile
# -*- mode: ruby -*-
# vi: set ft=ruby :

$master_script = <<SCRIPT
set -ex
date > /etc/vagrant_box_build_time
echo "root:linux" | chpasswd
cat << HOST >> /etc/hosts
10.10.10.10  controller.example.com controller
10.10.10.11  compute.example.com compute
HOST
echo "keepcache = 1" >> /etc/yum.conf
echo "nameserver 8.8.8.8" > /etc/resolv.conf
sed -i "s/SELINUX=enforcing/SELINUX=disabled/g" /etc/selinux/config
setenforce 0
echo "vagrant ALL=(root) NOPASSWD:ALL" >> /etc/sudoers.d/vagrant
chmod 0440 /etc/sudoers.d/vagrant
sed -i.orgi "s/PasswordAuthentication no/PasswordAuthentication yes/g"    /etc/ssh/sshd_config
systemctl restart sshd

systemctl stop firewalld
systemctl disable NetworkManager
systemctl stop NetworkManager
systemctl enable network
systemctl start network

#yum install -y centos-release-openstack-mitaka
yum install -y centos-release-openstack-newton
yum update -y
yum install -y openstack-packstack
SCRIPT

Vagrant.configure(2) do |config|
  config.vm.box = "centos/7"
  config.vm.define :controller do |node|
      node.vm.hostname = "controller.example.com"
      node.vm.provider :libvirt do |libvirt|
        libvirt.uri = 'qemu+unix:///system'
        libvirt.cpus = 8
        libvirt.memory = 16384
        libvirt.nested = true
        libvirt.storage :file, :size => '10G'
        libvirt.storage :file, :size => '10G'
      end
      #eth1 network
      node.vm.network :private_network, ip: "10.10.10.10"
      node.vm.network :private_network, ip: "10.10.20.10"
      node.vm.provision :shell, :inline => $master_script
  end
  config.vm.define :compute do |node|
      node.vm.hostname = "compute.example.com"
      node.vm.provider :libvirt do |libvirt|
        libvirt.uri = 'qemu+unix:///system'
        libvirt.cpus = 8
        libvirt.memory = 8192
        libvirt.nested = true
      end
      #eth1 network
      node.vm.network :private_network, ip: "10.10.10.11"
      node.vm.network :private_network, ip: "10.10.20.11"
      node.vm.provision :shell, :inline => $master_script
  end
end
Terminal1:
   vagrant up --provider libvirt

   vagrant status
   Current machine states:

   controller                running (libvirt)
   compute                   running (libvirt)


   vagrant ssh controller
   //change to root
   sudo su -
   ssh-keygen -t rsa -b 4096 -C "openstack"
   ssh-copy-id compute
   ssh-copy-id controller

   //Test ssh
   ssh compute "hostname"
   exit
   ssh controller "hostname"
   exit

สร้าง volume group ชื่อว่า ``cinder-volumes`` Terminal1::

   //prepare disk for volume group
   //change to root
   sudo su -
   fdisk -l

   fdisk /dev/vdb
   n
   p
   1
   enter
   enter
   w

   partprobe
   cat /proc/partitions

   pvcreate /dev/vdb1
   vgcreate cinder-volumes /dev/vdb1
ตั้งค่า Timeserver ให้แก่เครื่อง controller:
$ sudo yum install chrony -y
$ sudo vi  /etc/chrony.conf
//เปลี่ยนแปลง time server
server 1.th.pool.ntp.org iburst
server 0.asia.pool.ntp.org iburst
server 2.asia.pool.ntp.org iburst

//อนุญาติให้เครื่องในวง 10.10.10.0/24 สามารถ syncได้
allow 10.10.10.0/24

$ sudo systemctl restart chronyd
$ chronyc sources

210 Number of sources = 3
MS Name/IP address         Stratum Poll Reach LastRx Last sample
===============================================================================
^- ntp02.cpe.rmutt.ac.th         2   6     7     1    -16ms[  -11ms] +/-  225ms
^* time1.isu.net.sa              1   6     7     0  +5882us[  +11ms] +/-  140ms
^+ 202-65-114-202.jogja.citr     2   6     7     1    -13ms[-7965us] +/-   93ms
Note
ค่า Stratum มีค่าเท่ากับ 2
ตั้งค่า Timeserver แก่เครื่อง compute1 (สามารถเปิด อีก Terminal 2 มาทำงานได้ ):
$ sudo yum install chrony -y
$ sudo vi  /etc/chrony.conf
//เปลี่ยนแปลง time server ให้ชื้ไปยัง server
server 10.10.10.10 iburst


sudo systemctl restart chronyd
$ chronyc sources
210 Number of sources = 1
MS Name/IP address         Stratum Poll Reach LastRx Last sample
===============================================================================
^? controller.example.com     3   6     1     1  +6209us[+6209us] +/-   84ms
Note
ค่า Stratum มีค่าเท่ากับ 3 และ sync ไปยัง controller.example.com
เครื่อง controller ให้ run คำสั่ง packstack พร้อมกับ option เพื่อ ติดตั้ง openstack โดยคำสั่ง packstack จะรับค่าoption และนำไปสร้าง file template ที่มีตัวแปรที่กำหนด หลังจากนั้นจะส่งต่อให้ puppet นำไปสร้างเป็น puppet module เพื่อติดตั้ง openstack ต่อไป
ติดตั้ง openstack Terminal1:
//run packstck
//packstack --install-hosts=CONTROLLER_ADDRESS,COMPUTE_ADDRESSES

sudo su -
cd /root/
hostname
controller

packstack --install-hosts=10.10.10.10,10.10.10.11 \
--nagios-install=n \
--provision-demo=n \
--os-neutron-ovs-bridge-mappings=extnet:br-ex,physnet1:br-eth2 \
--os-neutron-ovs-bridge-interfaces=br-ex:eth0,br-eth2:eth2 \
--os-neutron-ml2-type-drivers=vxlan,flat,local,vlan \
--os-neutron-ml2-vlan-ranges=physnet1:1000:2000 \
--os-heat-install=y --os-heat-cfn-install=y \
--os-sahara-install=y --os-trove-install=y \
--os-neutron-lbaas-install=y \
--cinder-volumes-create=n \
--keystone-admin-passwd=linux
ท่านสามารถเเปลี่ยน password ได้จาก บรรทัด keystone-admin-passwd=<password ที่ต้องการ>
Applying 10.10.10.10_controller.pp
10.10.10.10_controller.pp:                           [ DONE ]
Applying 10.10.10.10_network.pp
10.10.10.10_network.pp:                              [ DONE ]
Applying 10.10.10.11_compute.pp
10.10.10.11_compute.pp:                              [ DONE ]
Applying Puppet manifests                            [ DONE ]
Finalizing                                           [ DONE ]

Additional information:
 * A new answerfile was created in: /root/packstack-answers-20161012-141203.txt
 * Time synchronization installation was skipped. Please note that unsynchronized time on server instances might be problem for some OpenStack components.
 * File /root/keystonerc_admin has been created on OpenStack client host 10.10.10.10. To use the command line tools you need to source the file.
 * To access the OpenStack Dashboard browse to http://10.10.10.10/dashboard .
Please, find your login credentials stored in the keystonerc_admin in your home directory.
 * Because of the kernel update the host 10.10.10.11 requires reboot.
 * Because of the kernel update the host 10.10.10.10 requires reboot.
 * The installation log file is available at: /var/tmp/packstack/20161012-011346-Rr34Lj/openstack-setup.log
 * The generated manifests are available at: /var/tmp/packstack/20161012-011346-Rr34Lj/manifests
[root@controller ~]#
Note
เมื่อติดตั้ง ประสบความสำเร็จ packstack จะรายงายผลออกมาที่สำคัญได้แก่
* ชื่อของ answerfile ที่ใช้สำหรับการแก้ไขต่อไปในอนาคต /root/packstack-answers-20161012-141203.txt
* ip address สำหรับการเข้าใช้งาน
Warning
หากมีความผิดพลาดแล้วจะต้อง run packstack ใหม่ให้ สั่งคำสั่ง จาก answerfil ที่สร้างขึ้น
[root@controller ~]# ls
packstack-answers-20161012-011347.txt
[root@controller ~]# packstack --answer-file=packstack-answers-20161012-011347.txt
ให้เปิด terminal เพื่อใช้สำหรับติดตั้งบนเครื่อง host โดยจะทำการติดตั้ง openstack client เพื่อเข้าไปใช้งาน
Terminal2:
//install openstack client
## Install openstack client [on host]
$ sudo dnf install python-{openstack,keystone,nova,neutron,glance,cinder,\
swift,heat,ceilometer}client

## create working folder

$ cd ~ && mkdir openstackrc && cd openstackrc

##create file ชื่อ admin_rc_v2 (เป็นชื่ออะไรก็ได)
$ cat << RC > admin_rc_v2
unset OS_SERVICE_TOKEN
export OS_USERNAME=admin
export OS_PASSWORD=linux
export OS_AUTH_URL=http://10.10.10.10:5000/v2.0
export PS1='[\u@\h \W(keystone_admin)]\$ '
export OS_TENANT_NAME=admin
export OS_REGION_NAME=RegionOne
RC
## Test เรียกดู user
$ source admin_rc_v2
$ openstack user list

+----------------------------------+------------+
| ID                               | Name       |
+----------------------------------+------------+
| 5c08e42a280445e283a71d6e01735811 | admin      |
| 08bc39d8bfaf40e5903dd96a0641ee9d | neutron    |
| a7dfe90d96e345268d303f95cab83ef2 | heat       |
| ab12686ca4b14868956d310f1aca1af8 | gnocchi    |
| 38be373dfe674e089e02c88be07f92a2 | aodh       |
| 036d2e3e3ed940dd84b0575d838621bc | nova       |
| 302bbb18eeab418f83288690521dd1bf | glance     |
| eb387675e73441a497f4549d59fa02f4 | trove      |
| 14c2a2c213d64be499315b8897585924 | sahara     |
| e44524eff3da4c57a8283caead1c63ea | ceilometer |
| 830c925ee56045df8c7a226612f66d26 | cinder     |
| 96f580c5af874165a54f28d71f3641ca | heat-cfn   |
| 355e46c0f63b499aa2b7eb14f698f97e | swift      |
+----------------------------------+------------+

$ openstack project list
+----------------------------------+----------+
| ID                               | Name     |
+----------------------------------+----------+
| 297c9df6fa3c469cbb587248cf59cb4e | admin    |
| 34c47a8e222543918153a2ed348f419d | services |
+----------------------------------+----------+

$ openstack role list
+----------------------------------+------------------+
| ID                               | Name             |
+----------------------------------+------------------+
| 3db26d6d909848aa8aefd886d9aa8f2a | SwiftOperator    |
| 84bb64935d284a248791c4a3bac183ff | heat_stack_user  |
| 88c6a2e7af25486487e61153554fde71 | admin            |
| 9fe2ff9ee4384b1894a90878d3e92bab | _member_         |
| b10f0d654b5c4d22bc2818c0c9d1012c | ResellerAdmin    |
| d609a95d200f46bca2d893b421f12cff | heat_stack_owner |
+----------------------------------+------------------+
เครื่อง host
Terminal2:
$ cd ~/openstackrc
$ wget http://download.cirros-cloud.net/0.3.4/cirros-0.3.4-x86_64-disk.img
$ openstack image create "cirros" \
--file cirros-0.3.4-x86_64-disk.img \
--disk-format qcow2 --container-format bare \
--public

ผลลัพท์ที่ได้
+------------------+------------------------------------------------------+
| Field            | Value                                                |
+------------------+------------------------------------------------------+
| checksum         | ee1eca47dc88f4879d8a229cc70a07c6                     |
| container_format | bare                                                 |
| created_at       | 2016-10-12T05:25:56Z                                 |
| disk_format      | qcow2                                                |
| file             | /v2/images/eb971176-4804-4fc2-8266-a90b1341b8a6/file |
| id               | eb971176-4804-4fc2-8266-a90b1341b8a6                 |
| min_disk         | 0                                                    |
| min_ram          | 0                                                    |
| name             | cirros                                               |
| owner            | 686e1f1af2ce4333931bd178c12c22c3                     |
| protected        | False                                                |
| schema           | /v2/schemas/image                                    |
| size             | 13287936                                             |
| status           | active                                               |
| tags             |                                                      |
| updated_at       | 2016-10-12T05:25:56Z                                 |
| virtual_size     | None                                                 |
| visibility       | public                                               |
+------------------+------------------------------------------------------+

แสดง รายการ image
$ openstack image list
+--------------------------------------+--------+--------+
| ID                                   | Name   | Status |
+--------------------------------------+--------+--------+
| eb971176-4804-4fc2-8266-a90b1341b8a6 | cirros | active |
+--------------------------------------+--------+--------+

$ wget http://cloud.centos.org/centos/7/images/CentOS-7-x86_64-GenericCloud.qcow2
$ openstack image create "centos-7-x86_64" \
--file CentOS-7-x86_64-GenericCloud.qcow2 \
--disk-format qcow2 --container-format bare \
--public
Network Architecture

Openvswitch device
Terminal 1 บนเครื่อง controller ตรวจสอบ ด้วยคำสั่ง ovs-vscht show
# ovs-vsctl show
6a15cbb5-18ef-4e40-8a6a-339dc0fccb7b
    Manager "ptcp:6640:127.0.0.1"
        is_connected: true
    Bridge br-tun
        Controller "tcp:127.0.0.1:6633"
            is_connected: true
        fail_mode: secure
        Port patch-int
            Interface patch-int
                type: patch
                options: {peer=patch-tun}
        Port br-tun
            Interface br-tun
                type: internal
        Port "vxlan-0a0a0a0b"
            Interface "vxlan-0a0a0a0b"
                type: vxlan
                options: {df_default="true", in_key=flow, local_ip="10.10.10.10", out_key=flow, remote_ip="10.10.10.11"}
    Bridge br-int
        Controller "tcp:127.0.0.1:6633"
            is_connected: true
        fail_mode: secure
        Port "int-br-eth2"
            Interface "int-br-eth2"
                type: patch
                options: {peer="phy-br-eth2"}
        Port int-br-ex
            Interface int-br-ex
                type: patch
                options: {peer=phy-br-ex}
        Port patch-tun
            Interface patch-tun
                type: patch
                options: {peer=patch-int}
        Port br-int
            Interface br-int
                type: internal
    Bridge br-ex
        Controller "tcp:127.0.0.1:6633"
            is_connected: true
        fail_mode: secure
        Port "eth0"
            Interface "eth0"
        Port phy-br-ex
            Interface phy-br-ex
                type: patch
                options: {peer=int-br-ex}
        Port br-ex
            Interface br-ex
                type: internal
    Bridge "br-eth2"
        Controller "tcp:127.0.0.1:6633"
            is_connected: true
        fail_mode: secure
        Port "eth2"
            Interface "eth2"
        Port "br-eth2"
            Interface "br-eth2"
                type: internal
        Port "phy-br-eth2"
            Interface "phy-br-eth2"
                type: patch
                options: {peer="int-br-eth2"}
    ovs_version: "2.5.0"
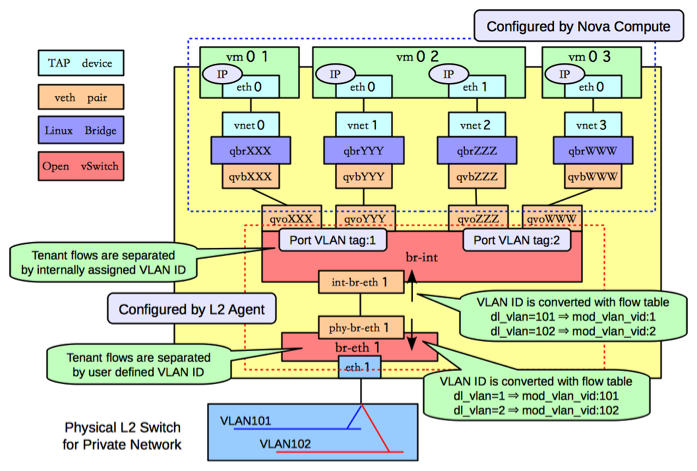
ภาพแสดง อุปกรณ์ ที่เป็น virtual devices ที่สร้างโดย openstack Compute node

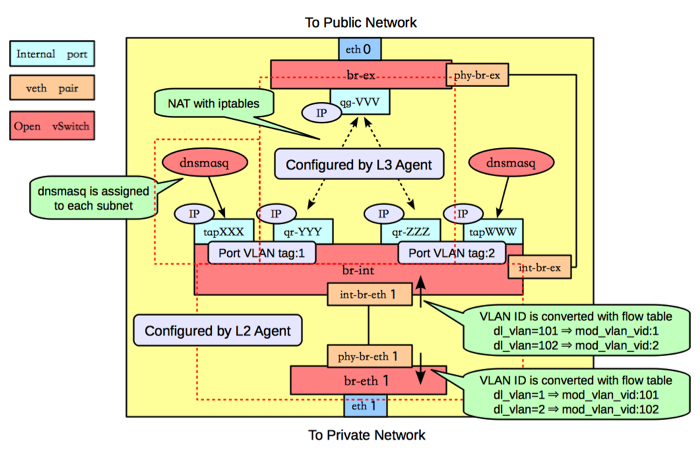
Controller/Network node

openstack bridge mappings ใช้สำหรับทำอะไร
Bridge Mappings เป็นการอนุญาตให้ traffic ของ provider network สามารถส่งผ่่านไปยัง physical network โดยการไหลของ package จะออกจาก provider network ผ่านทาง qg-vvv โดยรับมาทาง br-int และ veth pair ที่ทำหน้าเชื่อม br-int และ br-ex จะอนุญาต traffic ให้ผ่าน bridge ของ provider network และออกผ่านไปยัง physical network
int-br-ex <-> phy-br-ex
การเชื่อมต่อ config ของ bridge_mappings setting
bridge_mappings = extnet:br-ex,physnet2:br-ex2
สร้าง virtual network
สร้าง flat network ชื่อ extnet [เนื่องจาก –os-neutron-ovs-bridge-mappings=extnet:br-ex]
$ neutron net-create external_network --provider:network_type flat --provider:physical_network extnet  --router:external
Created a new network:
+---------------------------+--------------------------------------+
| Field                     | Value                                |
+---------------------------+--------------------------------------+
| admin_state_up            | True                                 |
| availability_zone_hints   |                                      |
| availability_zones        |                                      |
| created_at                | 2016-10-12T05:33:58Z                 |
| description               |                                      |
| id                        | b44cddbc-e544-434b-a96c-0ab95e741b29 |
| ipv4_address_scope        |                                      |
| ipv6_address_scope        |                                      |
| is_default                | False                                |
| mtu                       | 1500                                 |
| name                      | external_network                     |
| project_id                | 686e1f1af2ce4333931bd178c12c22c3     |
| provider:network_type     | flat                                 |
| provider:physical_network | extnet                               |
| provider:segmentation_id  |                                      |
| revision_number           | 2                                    |
| router:external           | True                                 |
| shared                    | False                                |
| status                    | ACTIVE                               |
| subnets                   |                                      |
| tags                      |                                      |
| tenant_id                 | 686e1f1af2ce4333931bd178c12c22c3     |
| updated_at                | 2016-10-12T05:33:58Z                 |
+---------------------------+--------------------------------------+


$ neutron subnet-create --name public_subnet --enable_dhcp=False --allocation-pool=start=192.168.121.100,end=192.168.121.200 \
--gateway=192.168.121.1 external_network 192.168.121.0/24

Created a new subnet:
+-------------------+--------------------------------------------------------+
| Field             | Value                                                  |
+-------------------+--------------------------------------------------------+
| allocation_pools  | {"start": "192.168.121.100", "end": "192.168.121.200"} |
| cidr              | 192.168.121.0/24                                       |
| created_at        | 2016-10-12T05:37:09Z                                   |
| description       |                                                        |
| dns_nameservers   |                                                        |
| enable_dhcp       | False                                                  |
| gateway_ip        | 192.168.121.1                                          |
| host_routes       |                                                        |
| id                | a34c2cde-e5ec-42b5-8de4-232b425fb861                   |
| ip_version        | 4                                                      |
| ipv6_address_mode |                                                        |
| ipv6_ra_mode      |                                                        |
| name              | public_subnet                                          |
| network_id        | b44cddbc-e544-434b-a96c-0ab95e741b29                   |
| project_id        | 686e1f1af2ce4333931bd178c12c22c3                       |
| revision_number   | 2                                                      |
| service_types     |                                                        |
| subnetpool_id     |                                                        |
| tenant_id         | 686e1f1af2ce4333931bd178c12c22c3                       |
| updated_at        | 2016-10-12T05:37:09Z                                   |
+-------------------+--------------------------------------------------------+
สร้าง router และผู้กับ exteranl_network ทีสร้างไว้ก่อนแล้ว
$ neutron router-create router1
Created a new router:
+-------------------------+--------------------------------------+
| Field                   | Value                                |
+-------------------------+--------------------------------------+
| admin_state_up          | True                                 |
| availability_zone_hints |                                      |
| availability_zones      |                                      |
| created_at              | 2016-10-12T05:37:58Z                 |
| description             |                                      |
| distributed             | False                                |
| external_gateway_info   |                                      |
| flavor_id               |                                      |
| ha                      | False                                |
| id                      | 61268195-4e9f-452a-bd1c-eb570d8177c1 |
| name                    | router1                              |
| project_id              | 686e1f1af2ce4333931bd178c12c22c3     |
| revision_number         | 2                                    |
| routes                  |                                      |
| status                  | ACTIVE                               |
| tenant_id               | 686e1f1af2ce4333931bd178c12c22c3     |
| updated_at              | 2016-10-12T05:37:58Z                 |
+-------------------------+--------------------------------------+

$ neutron router-gateway-set router1 external_network
Set gateway for router router1
สร้าง private network และผูก interface กับ router1
$ neutron net-create private_network
Created a new network:
+---------------------------+--------------------------------------+
| Field                     | Value                                |
+---------------------------+--------------------------------------+
| admin_state_up            | True                                 |
| availability_zone_hints   |                                      |
| availability_zones        |                                      |
| created_at                | 2016-10-12T05:41:12Z                 |
| description               |                                      |
| id                        | edaa3879-691e-4cef-89a4-eba6f866129e |
| ipv4_address_scope        |                                      |
| ipv6_address_scope        |                                      |
| mtu                       | 1450                                 |
| name                      | private_network                      |
| project_id                | 686e1f1af2ce4333931bd178c12c22c3     |
| provider:network_type     | vxlan                                |
| provider:physical_network |                                      |
| provider:segmentation_id  | 85                                   |
| revision_number           | 2                                    |
| router:external           | False                                |
| shared                    | False                                |
| status                    | ACTIVE                               |
| subnets                   |                                      |
| tags                      |                                      |
| tenant_id                 | 686e1f1af2ce4333931bd178c12c22c3     |
| updated_at                | 2016-10-12T05:41:12Z                 |
+---------------------------+--------------------------------------+

$ neutron subnet-create --name private_subnet private_network 192.168.100.0/24

Created a new subnet:
+-------------------+------------------------------------------------------+
| Field             | Value                                                |
+-------------------+------------------------------------------------------+
| allocation_pools  | {"start": "192.168.100.2", "end": "192.168.100.254"} |
| cidr              | 192.168.100.0/24                                     |
| created_at        | 2016-10-12T05:41:36Z                                 |
| description       |                                                      |
| dns_nameservers   |                                                      |
| enable_dhcp       | True                                                 |
| gateway_ip        | 192.168.100.1                                        |
| host_routes       |                                                      |
| id                | fe006934-5bdc-4643-aba7-4e4e59a587a6                 |
| ip_version        | 4                                                    |
| ipv6_address_mode |                                                      |
| ipv6_ra_mode      |                                                      |
| name              | private_subnet                                       |
| network_id        | edaa3879-691e-4cef-89a4-eba6f866129e                 |
| project_id        | 686e1f1af2ce4333931bd178c12c22c3                     |
| revision_number   | 2                                                    |
| service_types     |                                                      |
| subnetpool_id     |                                                      |
| tenant_id         | 686e1f1af2ce4333931bd178c12c22c3                     |
| updated_at        | 2016-10-12T05:41:36Z                                 |
+-------------------+------------------------------------------------------+

$ neutron router-interface-add router1 private_subnet
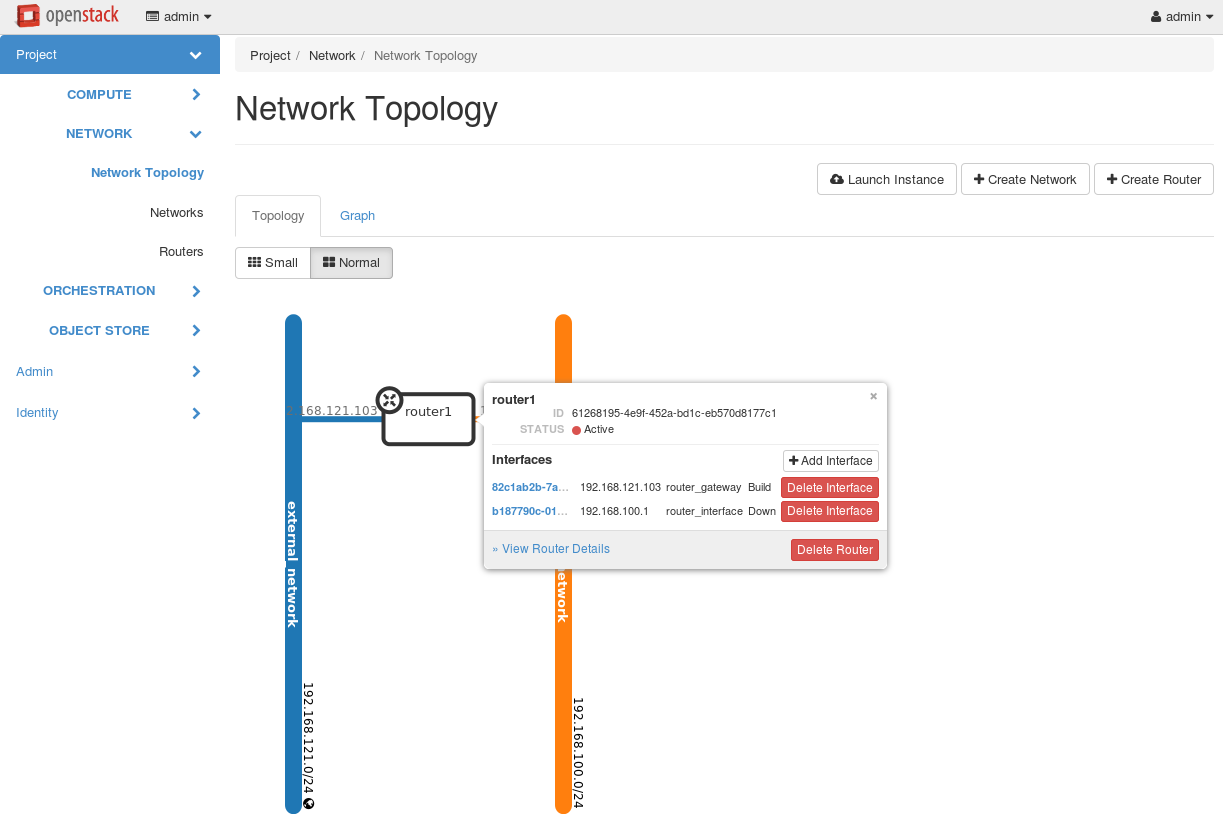
(ผลที่ได้ทำให้ external และ private subnet เชื่อมหากัน)
Added interface b187790c-0192-4819-8881-c82553260485 to router router1.
ผลที่ได้

หากเกิด Basic Error ดังรูปแก้โดย restart httpd

systemctl restart httpd