ISCSI Remote Storage
ISCSI
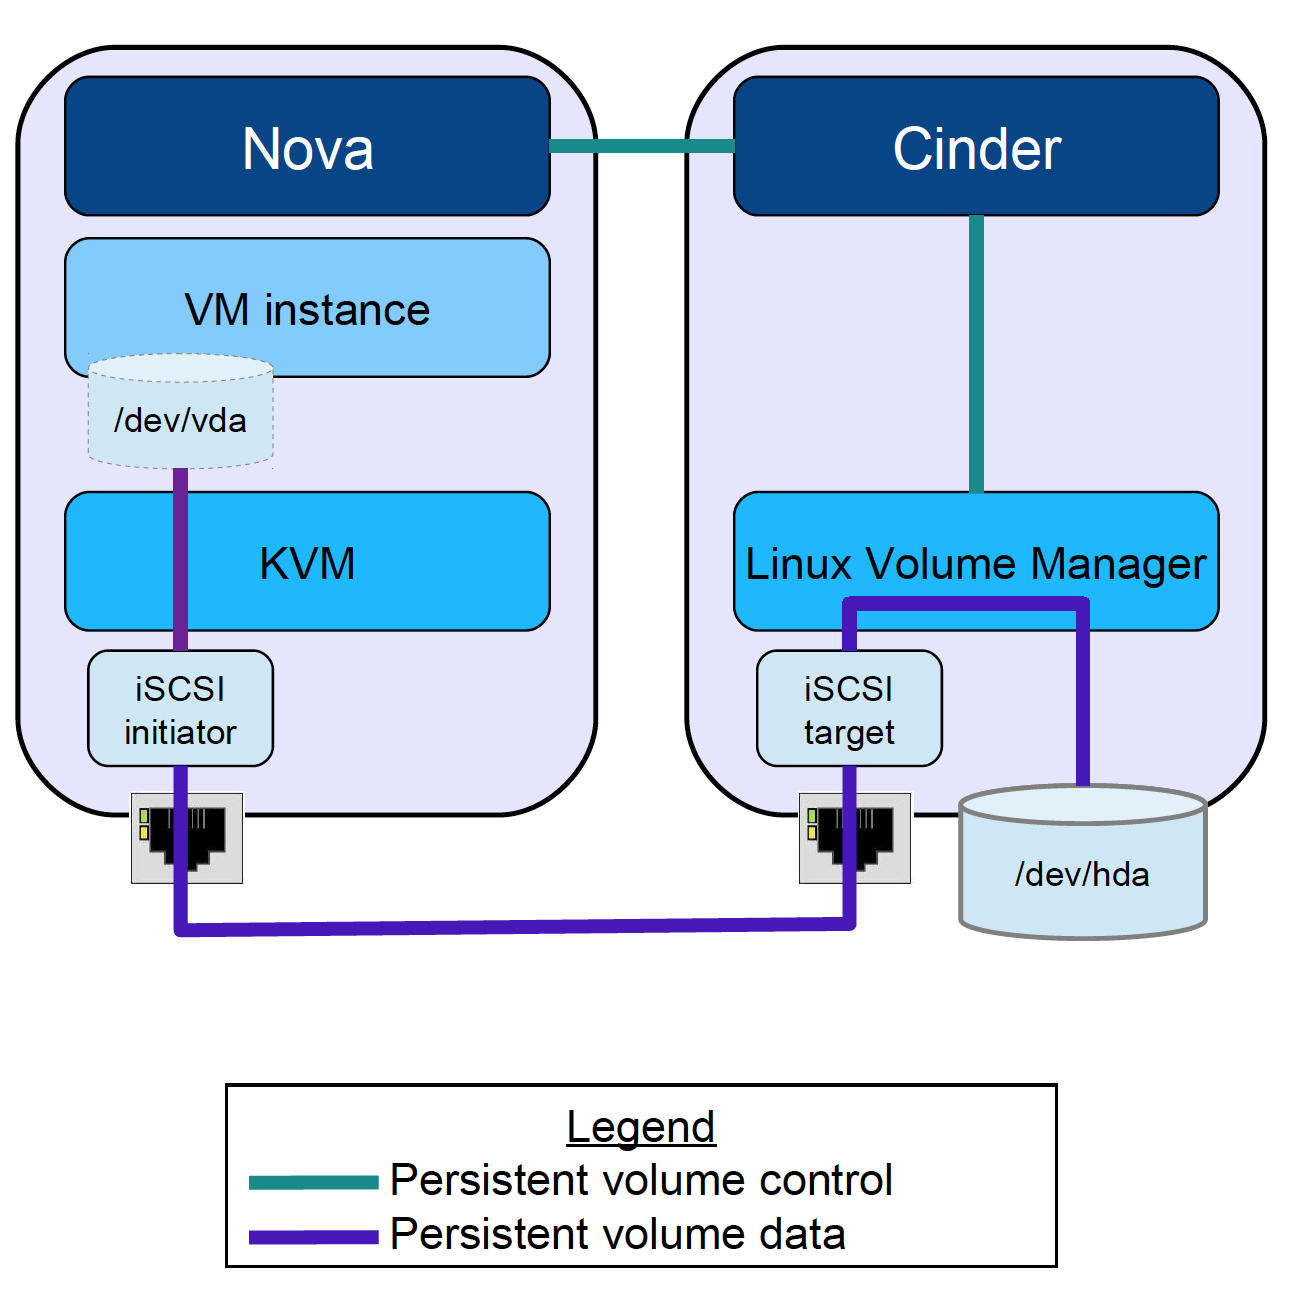
์Nova จะทำการร้องขอ disk จาก cinder และ cinder จะให้บริการผ่าน iscsi Disk Management *********** การทำสอบให้ใช้ Vagrantfile
# -*- mode: ruby -*-
# vi: set ft=ruby :

Vagrant.configure("2") do |config|
  config.vm.box = "centos/7"
  config.vm.define :server1 do |node|
            node.vm.network :private_network, :ip => "10.0.0.10"
            node.vm.network :private_network, :ip => "20.0.0.10"
            node.vm.hostname = "server1.example.com"
            node.vm.provider :libvirt do |domain|
              domain.uri = 'qemu+unix:///system'
              domain.driver = 'kvm'
              domain.memory = 2048
              domain.cpus = 2
              domain.nested = true
              domain.volume_cache = 'none'
              domain.storage :file, :size => '20G'
              domain.storage :file, :size => '20G'
              domain.storage :file, :size => '20G'
            end
  end
  config.vm.define :server2 do |node|
            node.vm.network :private_network, :ip => "10.0.0.11"
            node.vm.network :private_network, :ip => "20.0.0.11"
            node.vm.hostname = "server2.example.com"
            node.vm.provider :libvirt do |domain|
              domain.uri = 'qemu+unix:///system'
              domain.driver = 'kvm'
              domain.memory = 2048
              domain.cpus = 2
              domain.nested = true
              domain.volume_cache = 'none'
            end
  end
end
vagrant ssh server1
sudo su -
step 1 Prepare
แบ่ง partition ให้แก่ disk /dev/vdb /dev/vdc /dev/vdd
    fdisk /dev/vdb
Press 'p' to print partition table

Press 'n' to create a new partition

Press 'p' to create primary partition

Type Partition Number : 1

First Sector        : PRESS ENTER

Last Sector        :  PRESS ENTER

Press 'p' to print partition tables again

Press 't' to change partition ID

Type your partition Number :1

Hex code Partition code     : 8e

 Press 'p' to print partition tables again

Press 'w' to save and exit
Note
ทำซ้ำ กับ /dev/vdc /dev/vdd หลังจากทำเสร็จแล้วให้สั่งคำสั่ง partprobe เพื่อบอกให้ kernel รับทราบการเปลี่ยนแปลงของ partition:
partprobe
step 2 Prepare
            pvcreate /dev/vdb1
            pvcreate /dev/vdc1
            pvcreate /dev/vdd1

            vgcreate iscsi_vg  /dev/vdb1  /dev/vdc1 /dev/vdd1
            lvcreate -l 100%FREE -n iscsi_lv  iscsi_vg

vgs
(result)
    VG         #PV #LV #SN Attr   VSize  VFree
    VolGroup00   1   2   0 wz--n- 39.50g 320.00m
    iscsi_vg     3   1   0 wz--n- 59.99g      0

lvs
(result)
    LV       VG         Attr       LSize  Pool Origin Data%  Meta%  Move Log Cpy%Sync Convert
    LogVol00 VolGroup00 -wi-ao---- 37.69g
    LogVol01 VolGroup00 -wi-ao----  1.50g
    iscsi_lv iscsi_vg   -wi-a----- 59.99g
Install ISCSI server
Install
การใช้งานจะมี 2 ฝั่ง คือ server เป็นผู้ให้บริการ storage และ ฝั่ง client โดยที่ฝั่ง server ดำเนินการดังต่อไปนี้
yum install -y targetcli
targetcli
Warning: Could not load preferences file /root/.targetcli/prefs.bin.
targetcli shell version 2.1.fb41
Copyright 2011-2013 by Datera, Inc and others.
For help on commands, type 'help'.

/>
(หลังจาก run คำสั่งแล้วจะได้ prompt )
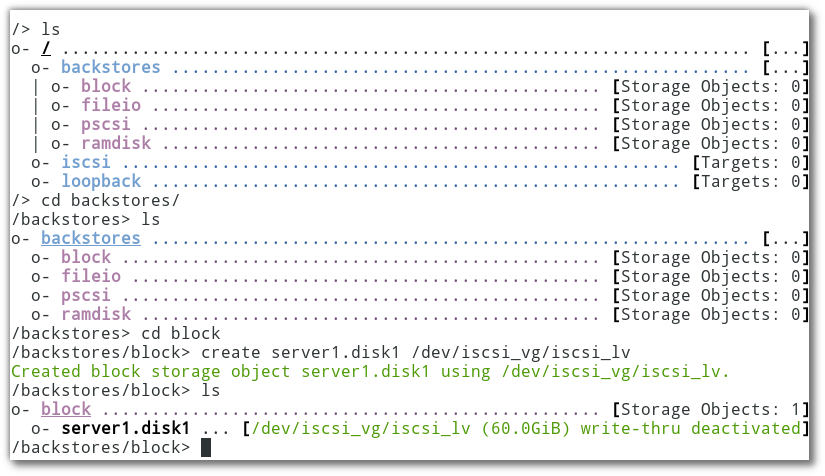
step1 create backstores
การสร้างสามารถทำได้ 2 แบบ แบบ1 แบบทีละขั้นตอน (เลือกแบบ1 หรือ 2 อย่างเดียว)
/>ls
/>cd backstores
/>ls
/>cd block
/>create server1.disk1 /dev/iscsi_vg/iscsi_lv
/>ls
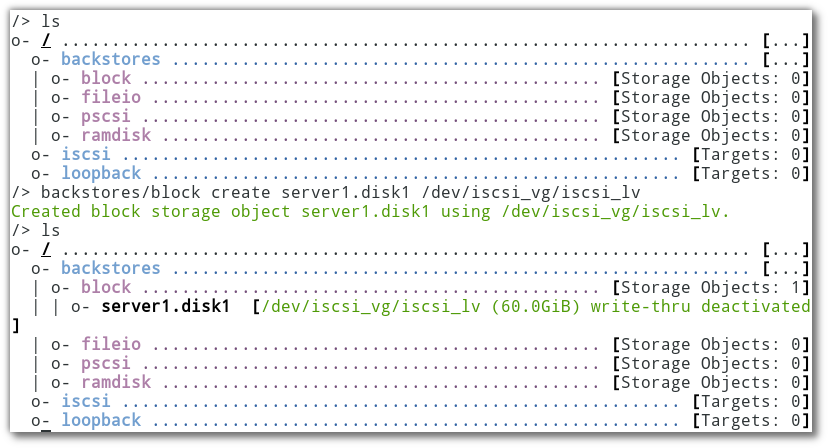
แบบ2 แบบขั้นตอนเดียว แต่ให้ดูตำแหน่งให้สอดคล้องก่อน
/> ls
/> backstores/block create server1.disk1 /dev/iscsi_vg/iscsi_lv
นอกจากการสร้าง backstore ให้สามารถใช้งาน disk แล้ว ยังสามารถสร้าง backstore จาก file system เป็นชนิด fileio เช่นสร้าง fileio มีชื่อว่า sharedata มีขนาด 1G ไว้ที่ /opt
dd if=/dev/zero of=/opt/sharedata.img bs=4G count=1
create backstore แบบ fileio
/> backstores/fileio create sharedata /opt/sharedata.img 4G
step2 สร้าง iSCSI qualified name (IQN)
ชื่อ iqn.2016-07.com.example.server1 ตามด้วย target name t1 (เป็นชื่ออะไรก็ได้)
/>iscsi/ create iqn.2016-07.com.example.server1:t1
Created target iqn.2016-07.com.example.server1:t1.
Created TPG 1.
Global pref auto_add_default_portal=true
Created default portal listening on all IPs (0.0.0.0), port 3260.
Note
IQN อ้างอิงตามมาตรฐาน RFC 3270 ( http://en.wikipedia.org/wiki/ISCSI)
จะได้ folder ใหม่ ตามชื่อ target ที่สร้างขึ้น และภายในfolder ก็จะมี folder ย่อย
/> cd iscsi/iqn.2016-07.com.example.server1:t1/
/iscsi/iqn.20...le.server1:t1> ls
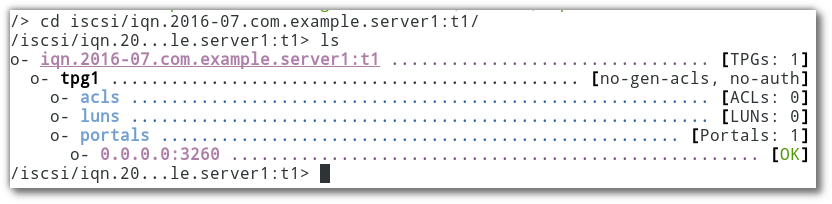
ภายใต้ tpg1 มี object ทั้งหมด 3 ตัวด้วยกัน
- acls (access control lists: restrict access to resources),
- luns (logical unit number: define exported resources),
- portals (define ways to reach the exported resources; consist in pairs of IP addresses and ports).
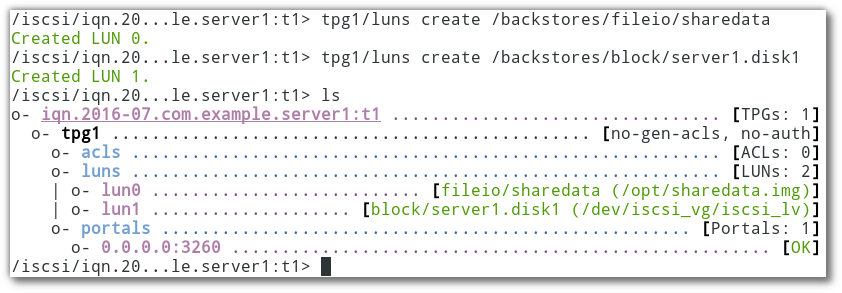
/iscsi/iqn.20...le.server1:t1> tpg1/luns create /backstores/fileio/sharedata

/iscsi/iqn.20...le.server1:t1> tpg1/luns create /backstores/block/server1.disk1

/iscsi/iqn.20...le.server1:t1> ls
step3 สร้าง acl
อ้างอิงกับ iqn ที่สร้างขึ้น iqn.2016-07.com.example.server1
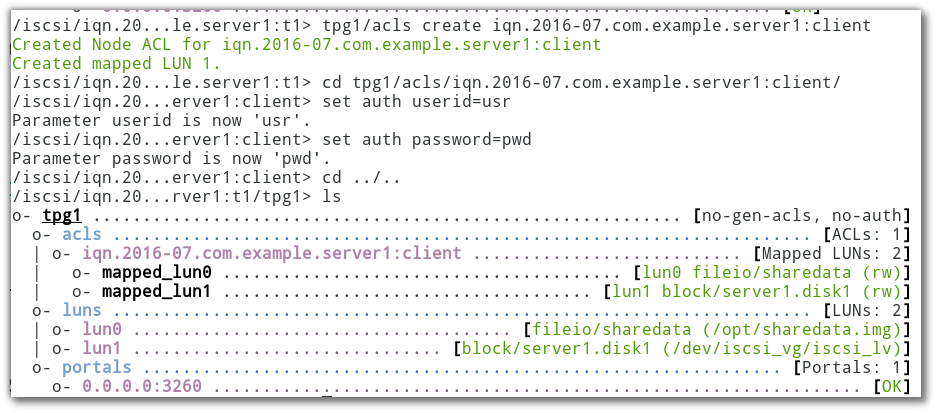
/iscsi/iqn.20...le.server1:t1> tpg1/acls create iqn.2016-07.com.example.server1:client
Created Node ACL for iqn.2016-07.com.example.server1:client
Created mapped LUN 1.
Created mapped LUN 0.

/iscsi/iqn.20...le.server1:t1> cd tpg1/acls/iqn.2016-07.com.example.server1:client/
/iscsi/iqn.20...erver1:client> set auth userid=usr

Parameter userid is now 'usr'.

/iscsi/iqn.20...erver1:client> set auth password=pwd

Parameter password is now 'pwd'.

/iscsi/iqn.20...erver1:client> cd ../..
/iscsi/iqn.20...rver1:t1/tpg1> ls
step4 สุดท้ายให้ออกจาก prompt ด้วยการพิม exit
/iscsi/iqn.20...rver1:t1/tpg1> exit
Global pref auto_save_on_exit=true
Last 10 configs saved in /etc/target/backup.
Configuration saved to /etc/target/saveconfig.json
จะได้ config ไฟล์เก็บไว้ที่ /etc/target/saveconfig.json

step 5 verify
    yum install -y net-tools

    # netstat -ant | grep 3260
    tcp        0      0 0.0.0.0:3260            0.0.0.0:*               LISTEN

firewall-cmd --permanent --add-port=3260/tcp
firewall-cmd --reload
Install ISCSI Client
เครื่อง client จะเรียกว่า initiator (เครื่อง server เรียกว่า target) ให้เปิดอีก terminal ใหม่
install
vagrant ssh server2
sudo su -
yum install -y iscsi-initiator-utils
cd /etc/iscsi/
ls
vi /etc/iscsi/initiatorname.iscsi

InitiatorName=iqn.2016-07.com.example.server1:client
vi iscsid.conf
57 node.session.auth.authmethod = CHAP
61 node.session.auth.username = usr
62 node.session.auth.password = pwd
Note
ให้แก้ไขไฟล์ iscsid.conf ในบรรทัดที่ กำหนด ท่านสามารถใช้คำสั่ง :se nu
เพื่อเปิดให้ vi แสดงหมายเลขบรรทัด หรือกด :57 :61 :62 เพื่อไปยังบรรทัดที่ต้องการ
start service
systemctl start iscsi
systemctl enable iscsi
(server1 eth0ip = 192.168.121.144)
iscsiadm --mode discovery --type sendtargets --portal 192.168.121.144
192.168.121.144:3260,1 iqn.2016-07.com.example.server1:t1
(นำค่าที่ได้ target name ที่ได้ ``iqn.2016-07.com.example.server1:t1`` มา ใช้)

iscsiadm --mode node --targetname iqn.2016-07.com.example.server1:t1 --portal 192.168.121.144 --login

(result)
Logging in to [iface: default, target: iqn.2016-07.com.example.server1:t1, portal: 192.168.121.144,3260] (multiple)
Login to [iface: default, target: iqn.2016-07.com.example.server1:t1, portal: 192.168.121.144,3260] successful.
verify
lsblk --scsi
NAME HCTL       TYPE VENDOR   MODEL             REV TRAN
sda  2:0:0:0    disk LIO-ORG  sharedata        4.0  iscsi
sdb  2:0:0:1    disk LIO-ORG  server1.disk1    4.0  iscsi
use disk
การใช้งาน disk
mkfs.ext4 /dev/sda

blkid | grep "/dev/sda"
/dev/sda: UUID="e45f36b4-f65b-4e8b-85df-be51024193fe" TYPE="ext4"

mkdir /iscsi_sda
vi /etc/fstab
(เพิ่ม ต่อสุดท้าย)
UUID=e45f36b4-f65b-4e8b-85df-be51024193fe /iscsi_sda  ext4 _netdev 0 0

mount -a
mount
(ในบรรทัดสุดท้ายแสดงผลการ mount)

/dev/sda on /iscsi_sda type ext4 (rw,relatime,seclabel,stripe=2048,data=ordered,_netdev)
ทำขั้นตอนอีกครัั้งสำหรับ /dev/sdb
mkfs.ext4 /dev/sdb
blkid | grep "/dev/sdb"

/dev/sdb: UUID="24fd379c-7045-4670-9574-1c797def1cda" TYPE="ext4"

mkdir /iscsi_sdb
vi /etc/fstab

UUID=24fd379c-7045-4670-9574-1c797def1cda /iscsi_sdb  ext4 _netdev 0 0

mount -a
mount a